Translate

lunes, 19 de noviembre de 2012

A muddy journey


Place/Lugar: Sierra Nevada National Park, Silleta del Padul, Granada, Spain.
Bike/Bici: Specializec Epic Comp

Dia intenso de lluvia durante todo el recorrido, al final del camino el barro aumenta y hace que el avance sea difícil. Buen trabajo Epic !!! 

A heavy rain day for all the journey. At the end of the trail the sticky mud increases and made the progress a very hard duty. Good Job Epic!!! 


domingo, 18 de noviembre de 2012

How to Install an App-V 5.0 Beta ---- Chapter 2

See previous preparatives in: How to install App-V deployment infrastucture: Chapter 1

At this point we have two computers, one installed with Windows Hyper-V server 2011, ant the other installed with Windows 7 Enterprise with Service Pack 1, and the RSAT. (Take care about this SP1, because we are going to need it a few times).

Using the RSAT, we must access to the Hyper-V and create and install four virtual machines with the following requirements, Operative Systems and Aditional Software installed on each one: (The Domain Controller is not recommend to be installed as a virtual machine, but for this trial we are going to do it virtualized).


Domain Controller: ADDS Server
A Windows 2008 R2 with the Active Domain Role installed.  Also we need to create the following objects into the Active Domain.

  • An Organizational Unit named AppVObjects to store all the following objects.
  • A group named AppV Administrators. Put the Domain Administrator into this group.
  • A group named AppV Computers.
  • A group named AppV Users.
  • A user named Usuario1. Put this user inside the AppV Users.
  • A user named Usuario2.


App-V Server
A Windows 2008 R2 with the Service Pack 1 installed and joined to the domain in ADDS Server.

Install the following software packages:
  • .Net Framework 4
  • Visual C++ 2010 SP1 Redistribuitable 64bits.
  • Microsoft Silverlight.
  • Powershell 3.0
Install the Application Server role with the .Net Framework 3.5.1 feature.

Install the IIS 7.5 for Windows 2008 R2 with the following features:
  • Common HTTP features (Static Content / Default Document)
  • Application Development (ASP.Net / .Net Extensibility / ISAPI Extensions / ISAPI Filters )
  • Security ( Windows Authentication / Request Filtering )
  • Management tools ( IIS Management Console )
Register ASP.Net with the .Net Framework 4.0 on IIS running the following at the command line:

c:\windows\Microsoft.Net\Framework\V4.030319 aspnet_regiis.exe -ir
c:\windows\Microsoft.Net\Framework64\V4.030319 aspnet_regiis.exe -ir

Install SQL Server 2008 R2. Note that you can´t use the express edition. You could use the standar, evaluation, or any other one. Also is important that you install the SQL server logged as the domain administrator.
During the installation of SQL Server you must consider the following points:
  • On the Setup Role window select SQL Server Feature Installation.
  • On the Feature Selection select Database Engine Services.
  • On the Server Configuration click over Use the same account for all SQL Server services, and in the account name enter NT AUTHORITY\SYSTEM, click Ok, and change all Startup Types to Automatic.
  • On the Database Engine Configuration click Add Current User to add de Administrator domain, if you are not logged as him then add it mannually.

Once we have installed SQL Server now it´s time to install the Appv  Management and Publishing Server, so we must run appv_server.exe to do it. It is recommended to install both servers in separate machines, but for this time we are going to install together in the same machine.
These are the steps we must perform during the installation process:
  • On the feature Selection, select Management Server, Management Server DB and Publishing Server.


  • On the Management Server Configuration windows and on the Publishing server configuration use the following configuration:


If you obtain the followuing error message after clicking over Next in the Management Server Configuration is because you are not logged with the Domain Administrator.


Take notice that we have used the Management Server as the Publishing server, an also that we have used http://localhost:5353. This is becacuse there is a bug in the App-V 5.0 Beta when the Management and Publishing servers are hosted in the same machine that causes an error 500 and trying to access the Publishing site.

Now we must create a folder at C:\ in the server named Content, and we must gave full permission to the AppV Administrators, and the Computer. In this folder we must put the sequenced applications. You could see in another post how to sequence an applicattion.


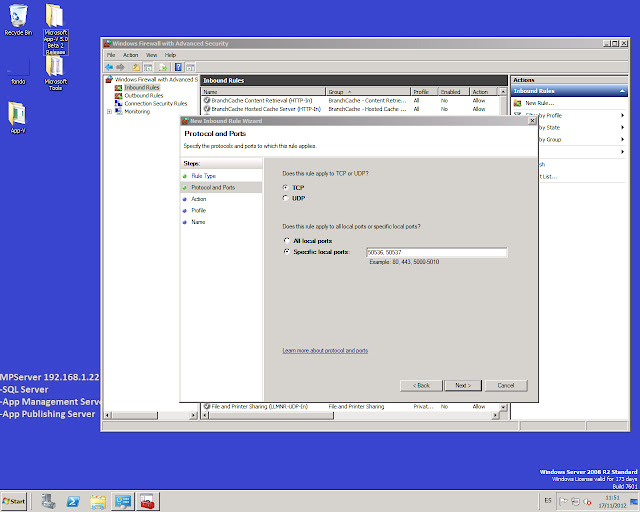
It´s time to create a new rule for the windows firewall to avoid block access to the ports defined in the AppV Server for management and publishing. So we go to Control Panel, Windows Firewall and Advanced Settings and create a new rule enabling the ports 50536 and 50537.


The final part of the installation is to publish an application into the AppV Center. To do this we must go to the Management console with an Internet Explorer typing http://localhost:50536/console.html. First we must go to Server and add the actual server. Later we must type the direction to the sequenced application and add it to the publishing center. Its important to use an UNC or HTTP path type to the location of the application to publish.

  
Once we have installed AppV Server, we have the ports opened for the firewall, and we have the application sequenced placed at the content folder, it´s time to try if all is ok. First we could try the Management server by opening an Internet Explorer and typing http://localhost:50536 or http://localhost:50536/Help. We must obtain the following responses if the Management Site is ok.


To test the publishing server we must type http://localhost:50537 from a I.e. at the server, or http//appvcenter:50537 from a computer client. In that case we would obtain a window showing the applications sequenced into the App Server. (The picture above shows the Publishing server accesed from a client computer).


Here you can see the IIS config window after the installation process:


Also you can see the registry typing regedit at the command line to see the configuration for the Management and Publishing server:


App-V Client
A Windows 7 with the Service Pack 1 installed and joined to the domain in ADDS Server and with at least 40GB of Hard Disk.

Install the following software packages:
  • .Net Framework 4
  • Powershell 3.0
Install as an administrator the Appv_client.

Using Powershell run the following commands:

Set-ExecutionPolicy Unrestricted
Import-Module AppvClient
Add-AppvPublishingServer -Name App-V PubS -URL http://appcenter:50537
Set-AppvPublishingServer -ServerId 1 -GlobalRefreshEnabled 1 -GlobalRefreshOnLogon 1
If you want to make any change to this parameters you need to remove the Publishing server using the powershell and the command, and adding again with the same commands used previously.
Remove-AppvPublishingServer -ServerID 1
Other way to do it is editin the registry with regedit.

And that´s all, now you can restart the Client machine and login with the user Usuario1 and the virtual apllication must appear in the desktop and in the  programas menu. On the other hand if you used the Usuario2 to log into the client, the virtual application will not apper because Usuario2 is not a member of the AppV Users, wich is the only group allowed to the XML Notepad virtual application.


domingo, 11 de noviembre de 2012

Ampliar disco virtual en Hyper-V / Extend virtual disk in Hyper-V


Algunas veces necesitamos poder ampliar el tamaño del disco duro de nuestras máquinas virtuales. Para eso usaremos el Administrador de Hyper-V, seleccionando la opción Editar Disco mostrada en el panel de acciones del servidor en el que esté la máquina a la que ampliar el disco.

Sometimes we need a litle more space in the hard disk of our virtual machine. It is posible to expand the virtual disk of a virtual machine using the Hyper-V Administrator and the action Edit Disk you can find in the Action Panel of the server.


Se nos abre una ventana donde pulsando sobre examinar tendremos que escoger el fichero sobre el que se guarda la máquina virtual a la que ampliar el disco. En este punto es importante remarcar, como se nos hace en la ventana abierta, que la máquina seleccionada no puede tener instantánea, ya que sinó fallará el proceso de expandir el disco duro. En caso de tener instantáneas tendremos que borrarlas para poder ampliar el disco. Una vez selecionado el archivo pulsamos siguiente.
At the open window we must click over Examine to find the correspondent file for the virtual disk. It is important to take notice that the virtual machine couldn´t have Snapshoots to expand the size of the virtual disk. In the case the virtual machine have one or more Snapshoots the you must remove all of them previous to expand the virtual disk. Once you have selected the file you must click next.


Cogemos la opción Expandirlo y pulsamos siguiente.

Choose Expand and click next.


Se nos muestra el  tamaño actual, y debajo el nuevo tamaño deseado. Fijamos dicho tamaño y pulsamos Finalizar.

In this windows you could see the actual size for the virtual disk and also you can choose a new size for this virtual disk. Once you have entered a new size you must click Finish to expand the disk


En este punto ya hemos conseguido ampliar el disco duro de nuestra máquina virtual. Si sobre dicha máquina tienes ya instalado un sistema operativo, por ejemplo Windows 7, deberás acudir al Panel de Control, Herramientas Administrativas, Administrador de Equipos y a la administración de discos para expandir el tamaño del disco con el nuevo espacio añadido al disco virtual.
At this point we have finishes to expand the size of the virtual disk, now if you have installed an operative system, you must expand the disk inside this operative System. In the example we have a Windows 7 with a hard disk expanded from 20 to 41GBs.
So you must go to Control Panel, Administrative Tools, Computer Management and finally to Disk Management to expand the disk with the new space added.


Con el botón derecho sobre la partición de 19,9GB hacemos click y escogemos la opción extender volumen. Se abre entonces la siguiente ventana, donde escoger el tamaño deseado para extender, cogiéndolo del espacio nuevo disponible.
Right Click over 19,9GB partition and choose Volume Expand. And in the next windows we must choose the amount of space we want to add to the partition.


Y finalmente conseguimos ampliar el tamaño de la partición usada para nuestro Windows 7.

And that´s all, we have a new sized partition in our Windows 7.


sábado, 10 de noviembre de 2012

How to install AppV 5.0 Beta --- Chapter 1

Microsoft App-V enables the administrator to deploy applications as services in real time. Here we are going to explain how to create an App-V deployment infrastructure.
The components we need to implement an App-V infrastructure deployment are the following:

A server acting as a Domain Controller.
An Application Virtualization Manager Server, with acts as a centralized location to manage the infrastructure for delivering virtual applications. This component needs a Microsoft SQL Server for its data store.
An Application Virtualization Publishing Server, which hosts the virtual application package for streaming.
An App-V Sequencer, used to transform applications into virtual applications.
And of course one or more App-V Clients. They retrieves virtual applications and publishes on the client.

It is recommend to use one server for each component, but for learning purpose you could use the same server for the Manage and the Publishing, but not for the Domain Controller.
You could use physical or virtual machines to those components, but in the case of the Sequencer it is recommend to use a virtual machine because you must install the applications and at the end of the sequence process you must uninstall to came back to the state before the application install. And for this purpose is very interesting to use snapshots and reverting it.

In our example we are going to work with all the components as virtual machines, and for this purpose we need two computers, one to hosts the virtual machines and one to manage those virtual machines.

The first one has a Windows Hyper-V Server 2011 which hosts four virtual machines, the Domain Controller, the Management & Publishing server, the sequencer, and a client to probe the App-V deployment.
The second one has a Windows 7 Enterprise with the Remote Server Administration Tools installed to manage the virtual machines hosts inside the Hyper-V Server.

So, the first thing we need to do is to install our computers with the Hyper V Server, and the Windows 7 Enterprise. In this one we need also the RSAT (Remote Server Administration Tool) installed to access de Hyper-V server to create the four Virtual Machines needed for our infrastructure. Two of those virtual machines installed with Windows 2008 Server R2, and the other two virtual machines with Windows 7 Pro.

In the next chapter we would prepare each virtual machine to be able to play the role assigned to it.


viernes, 9 de noviembre de 2012

Hyper-V versus Xenserver

Pantallazo de mi equipo de trabajo (escritorio extendido a dos pantallas) con un Windows 7 Enterprise con XenCenter para controlar un servidor con XenServer 6.1 y Windows Remote Server Administration Tools para controlar un servidor  con Windows 2008 Hyper-V Server R2.
El primero de ellos con dos máquinas virtuales, una con un Windows 2008 Standard R2 controlador de dominio y la otra con un  Endian Firewall.
El segundo de ellos muestra una máquina virtual con Windows 2008 Standard R2 instalando desde el DVD del servidor físico, y el segundo otra máquina virtual con Windows 7 desplegándose desde un Servidor de Implementaciones de Windows (WDS)
Adicionalmente y mediante Servicios de Escritorio Remoto se muestra un Windows 2008 Standar R2 con las funciones de Servidor de Implementaciones de Windows y de DHCP funcionando instalado sobre una máquina física.


A Windows 7 Enterprise with XenCenter installed to control a XenSever 6.1 hypervisor, and the Windows Remote Server Administration Tools also installed to control a Windows 2008 Hyper-V Server R2 with the Domain Controller role.
The first one has two Citrix virtual machines installed: A Windows 2008 Standard R2 and an Endian Firewall.
The second one shows one Windows 2008 Standard R2 virtual machine during his install process from the DVD of the fiscal sever, and the other shows a Windows 7 deployment from a Windows Deploymet Server.
Also we have a Remote Desktop Service connection to a Windows 2008 Server Standard R2 with the Windows Deployment Services and DHCP roles configured.


sábado, 3 de noviembre de 2012

Remote Server Administration Tools for Windows 7

Para poder trabajar con máquinas virtualizadas en entornos Windows hay dos formas, ámbas basadas en la tecnología Hyper-V.
La primera de ella sería usando el rol de Hyper-V sobre una sistema operativo de servidor como Windows 2008 Server o el nuevo 2012 Server. Esto es lo que llmamos una virtualización Host-based, es decir la virtualización se realiza sobre una capa de software previa al hardware.
La segunda forma sería mediante Windows Hyper-V Server 2008 o 2012 consistente en virtualzar sobre el hardware directamente, es decir Bare-metal vistualization. Este es el mismo caso de Citrix XenServer y VMWare ESXi.
El el caso de decidirnos por Windows Server Hyper-V la primera consideración es que este sistema puede descargarse gratuitamente de la web de Microsoft, y básicamente consiste en un Sistema Operativo que se instala en el servidor físico que contendrá las máquinas virtuales, el Host, y que no es mas que un Windows OS en su forma Server Core con las única función o rol de Hyper-V.
Una vez instalado sobre el host aparcerá un menú tipo texto donde configurar las principales características de la máquina, es decir, nombre, red, dominio, acceso remoto, etc…
Para poder instalar y gestionar las máquina virtuales necesitaremos otra máquina (de igual manera que en XenServer y ESXi), que puede ser una máquina con Windows 2008, 7 o 2012.
En el caso de Windows 2008 y 2012 tendremos que instalar la función de Hyper-V para a partir de este conectar con nuestro servidor a través de la IP configurada y así poder crear nuevas máquinas.
En el caso de Windows 7 tendremos que añadir las Herramientas de Administración Remota de Servidor, las RSAT for Windows 7. Podemos descargarla de la siguiente página:
En ese enlace descargaremos la versión correspondiente al Windows 7 que tengamos instalado, 32 o 64 bits. Después instalaremos la herramienta descargada, e iremos al Panel de Control, Programas y Características y a la sección de Activar o desactivar características de Windows.
Una vez se abra la ventana de Activar Desactivar las características de Windows desplegaremos la opción de Herramientas de Administración Remota del Servidor hasta dar con la opción de Herramientas de Hyper-V. La activamos y aceptamos.


Esperamos unos minutos a que se apliquen los cambios, y entonces podremos acceder a la herramienta de Administración de Hyper-V en las Herramientas Administrativas. En este punto comentar que es necesario que el usuario del equipo con Windows 7 esté dado de alta como Administrador del servidor Hyper-V