Translate

lunes, 29 de octubre de 2012

Custom Install Images


Tres pasos serán necesarios para la creación de una Custom Install Image:
  •  Crear la imagen a capturar, Capture Image.
  • Prepararla usando Sysprep
  • Capturar la imagen mediante el Image Capture Wizard.


Dos puntos a tener en cuenta antes de capturar la imagen es que WDS solo verá imágenes que hayan sido preparadas con Sysprep, y por otra parte es que el sitio donde guardar la imagen debería ser un sitio local, ya que sinó no podremos capturar la imagen.

Para crear la Install images crearemos primero una Capture Image. Es decir una Boot Image que correremos sobre la máquina cliente para capturar el sistema de esa máquina dentro de un fichero .wim. Podemos crear la Capture Image en un DVD, Pen-Drive, etc… para luego arrancar con ello sobre el equipo cliente.
Se pueden crear Boot Images a partir del fichero Boot.Wim del DVD de Windows 2008, o crearla a partir del fichero WinPE.Win de Windows AIK.

Para crear ya la imagen iremos al WDS MMC y expandiremos el nodo Boot Images, y luego sobre la Boot Image deseada haremos botón derecho y cogeremos la opción Create Capture Image.


Pondremos el nombre de la Imagen, una descripción y el lugar donde almacenarla. Clickeamos sobre la opción de añadir la Boot Image a WDS, y pulsamos finalizar para terminar el proceso de crear la Boot Image.

Se abrirá una ventana donde seleccionar la ubicación de la imagen que grabamos posteriormente (estará ya rellenado), y pulsamos siguiente. Fijaremos el nombre y la descripción, (también estará relleno con los valores escogidos previamente). Volvemos a pulsar siguiente hasta completar .


Ya tenemos nuestra Boot Image creada y que nos cargaremos sobre la máquina cliente. Necesitamos ahora un ordenador donde crearemos la maqueta de nuestra instalación, es decir, el sistema deseado con su configuración, programas, etc…
Localizaremos la versión de Sysprep correspondiente al sistema operativo que vamos a capturar. En el caso de Windows 7 y 2008 R2 ya viene incorporado con el sistema, con lo que solo tenemos que ir a la línea de comandos, movernos al directorio C:/Windows/system32/Sysprep y ejecutar lo siguiente:

  • Para Vista, 7 y 2008: Sysprep /oobe /generalize /reboot
  • Para XP: Sysprep –mini –reseal –reboot
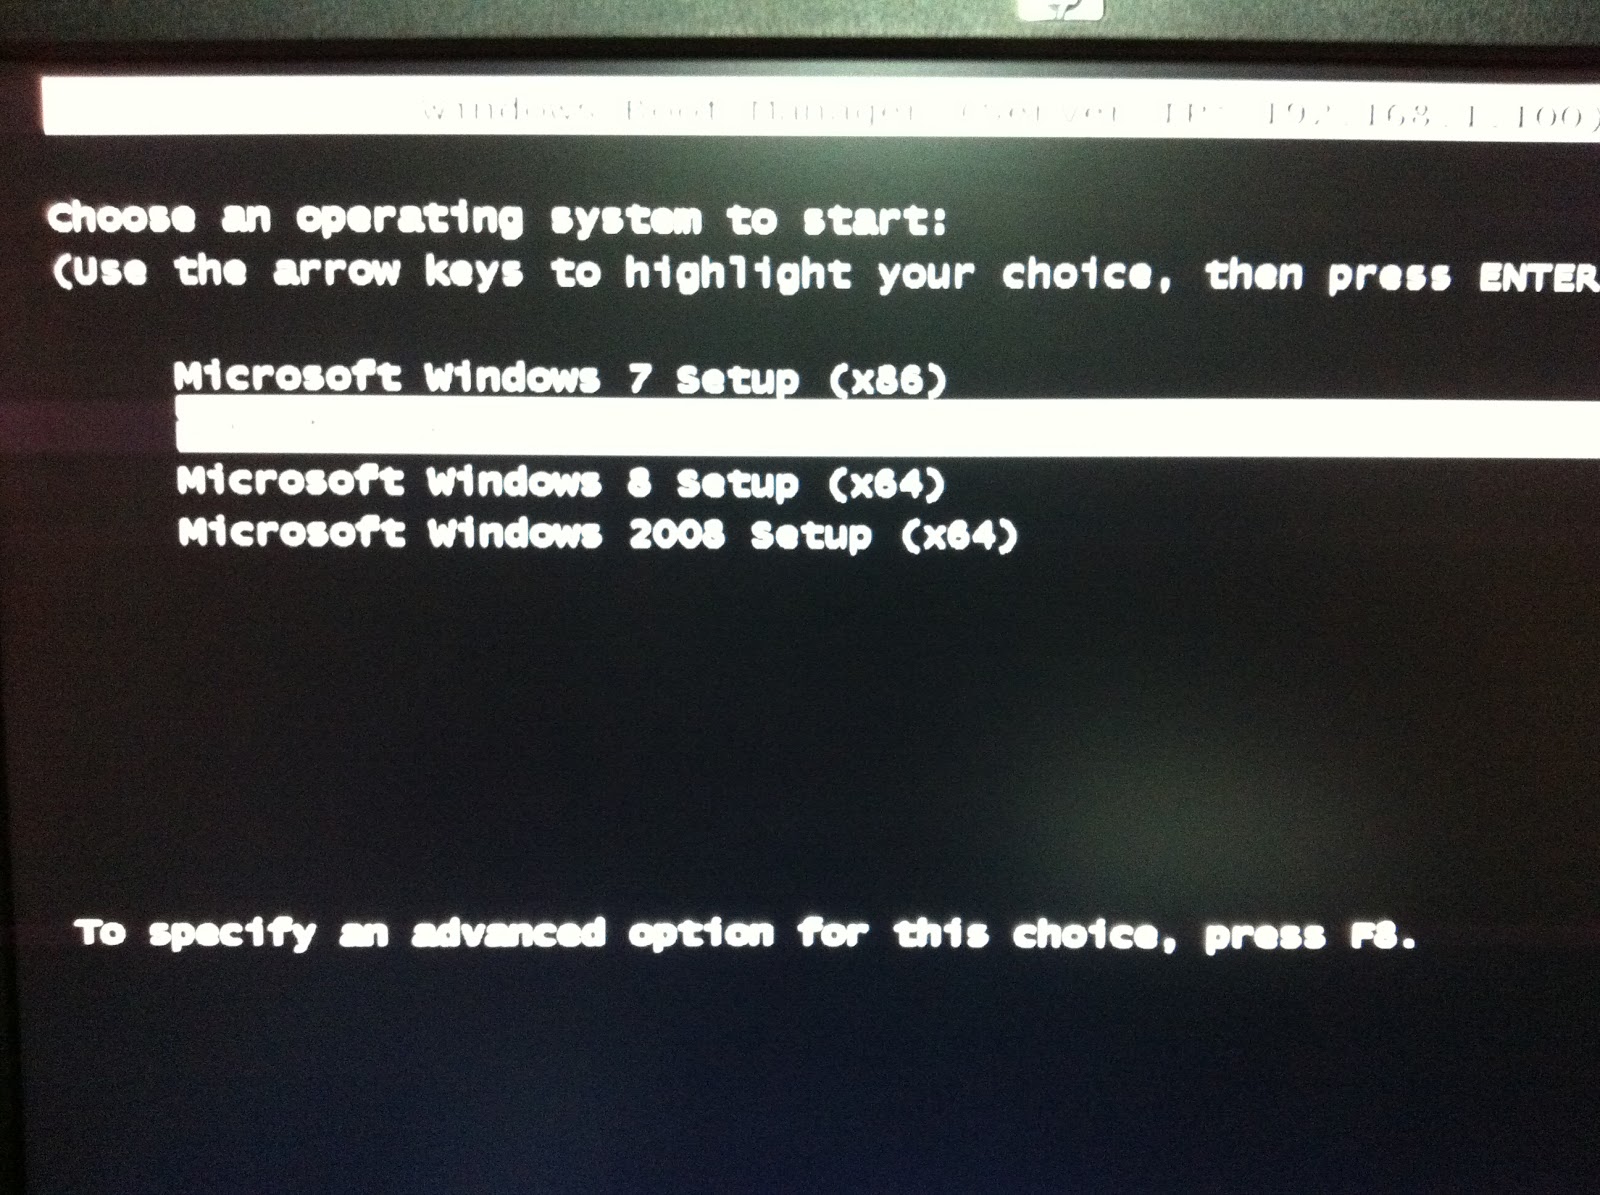

Cuando el equipo arranque haremos un arranque de red pulsando F12, y de menú de arranque que aparezca seleccionaremos la Capture Image previamente creada.


Escogeremos después el nombre de la imagen y la localización del fichero .wim resultante. Como hemos dicho antes se pide que la ubicación sea local para evitar problemas de red que dañen el fichero imagen.


Existe también la opción de conectar con un servidor de WDS para subir la imagen. En ese caso debemos dar el nombre del servidor y el grupo donde ubicar la imagen.
Podremos optar también por subir el fichero directamente.

Una vez finalizado el proceso de captura el equipo reinicia , volverá a instalar dispositivos, tenderemos que finalizar la instalación,  y quedará como estaba. En la carpeta local que hayamos seleccionado tendremos la Install Image creada de dicho equipo. Si no la hemos subido previamente al servidor WDS podremos copiarla a un USB, o moverla por la red hasta el servidor, y así poder añadirla a nuestro WDS.

domingo, 28 de octubre de 2012

Windows Deployment Services


Requisitos previos
Un  DHCP en la red
Un DNS en la red.
Que el servidor esté en un Dominio o que lo sea.
El disco del servidor en formato NTFS.

EL servidor DHCP puede ser el mismo que tenga la función de WDS, Windows Deployment Server, o cualquier otro que haya en la red. En el caso de ser el mismo WDS el DHCP habrá que “tocar” algo en la configuración que luego veremos. En el ejemplo supondremos que el DHCP es distinto al WDS.

Instalación del Servidor
Primero Instalamos los servicios de WDS y Transport Server en el servidor que será WDS.

Nos logeamos con un usuario que sea Administrador de Dominio.

Vamos  a Herramientas administrativas y a Windows Deployment Services, y al abrirlo aparecerá el servidor como servidor WDS. Hay que configurarlo, para lo que hacemos botón derecho sobre él y seleccionamos configurar servidor.

Seleccionamos el almacén donde se guardaran las Boot images, Install images, PXE Boot files y las herramientas de WDS. En este caso C:/RemoteInstall. Es recomendable que ese almacén se encuentre en un disco distinto al del sistema.
Seleccionamos sobre que tipo de clientes responderá el servidor:
Conocidos, los del dominio.
No responder a cualquiera.
Ámbos. (cogemos esta)

En este punto hemos terminado de configurar el servidor, se nos da la opción de directamente empezar a cargar imágenes.

Añadiendo imágenes al servidor
Ahora tenemos que añadir imágenes, que pueden ser de dos tipos:
  • Boot Images, imágenes Windows PE que nos permitan arrancar un equipo cliente para luego realizar una instalación de sistema.
  • Install Images, La imagen del sistema operativo que vamos a volcar sobre el cliente.

Lo primero que se nos pide ahora es el lugar donde está el DVD de instalación del sistema para el que queremos crear la imagen. De ese DVD se cogerán los ficheros Boot.wim (contiene Windows PE y el cliente para WDS), e Install.wim (Contiene el sistema operativo que vamos a distribuir).  Este ultimo puede ser creado por nosotros a nuestro gusto con el sistema deseado.
En nuestro ejemplo vamos a usar el propio DVD de instalación de W2k8 metiéndolo en la unidad del servidor, y seleccionándolo en el  menú que se nos abre.

El siguiente paso es crear un grupo de imagen, es decir un grupo de imágenes que comparten determinados ficheros, por ejemplo las diversas versiones de un sistema, lo que hace que no haya que copiar todos los ficheros para cada uno de estos sistemas, sino solo aquellos en los que se diferencian, esto permite ahorrar espacio en disco. Ponemos el nombre deseado W2K8R2Group y finalizamos. En este caso se creará un grupo que contendrá una Boot image y 8 Install images (Una por cada versión del sistema que incluye el DVD).
Esto que estamos haciendo a través del Wizard se puede también hacer a través del WDS MMC, permitiéndonos poder elegir que imágenes del disco pasar para el caso de que no las queramos todas.

Una vez cargadas las imágenes, y si miramos en el WDS MMC, podremos ver bajo nuestro servidor la carpeta Install Images, que contendrá las 8 imágenes de los 8 sistemas disponibles, así como la carpeta Boot Images que contiene un sistema de arranque.


Como distribuir una imagen
Ahora que ya tenemos al menos una Boot Image y una Install Image, podremos distribuir una imagen a un equipo cliente. Dicho equipo tiene que poder conectarse a la red mediante PXE, recibirá entonces una IP de nuestro DHCP y arrancará desde la tarjeta de red.
Una vez conecte con el servidor pulsamos F12, y empezará el despliegue de la imagen. Una vez terminada en el equipo cliente habrá que finalizar la instalación.

En próximos posts veremos como cargar una imagen propia, como cargar drivers a una imagen o grupo de imágenes, etc…

sábado, 27 de octubre de 2012

Windows error 0x80300001

This error appear during the beginning of the Windows 2008, 7 and Vista install, and after an additional drivers load. 

The problem is caused because you need to extract the Windows OS install CD/DVD to put it in a CD/DVD containing the drivers you need to load. 
Once you have finished to load the needed drivers it´s very usually to forget to charge again the Windows OS CD/DVD into the DVD unit, so change i,t and you will continue with the installation.


sábado, 20 de octubre de 2012

How to make your computer send an email containing your public IP

For most of the Geeks I used to know, is something very usual to need acces to their/our home computers. In most of the cases we use Terminal Services, but this, supose the need to know the public IP of our home router which could route the Terminal Service to the correct Computer into our home network.
This is not a problem if you have a fixed public IP, but here in Spain, it supose about 10-20€ per month depending on the ADSL provider.
Other way to solve this problem, is to use a DynDNS, No-IP, etc... who cares for the changes in your public IP, but actually most of this Companies started to charge a little amount of many for their services.
So,.... we are in crisis, we need a free-cost way to solve the problem, and for this, we have the help of PowerShell in the new windows OS.
 
The idea is to have a computer inside our network, wich could obtain the public IP of the router, and finally sent it to an email account that we can access to see the desired IP to use with the Terminal Services.

So this is what we need:

  • A computer at home which is going to obtain the IP and sent it to us via email. This computer must have a Windows OS with PowerShell (W2k8, W7, etc...)
  • A google account to receive the mail with the IP.
  • A Script that search the public IP using whatismyip.com, put this IP into in email, and sent it to our email.


This is the code for the script file:

" Ugehidalgo@gmail.com. "
" "
"   Script for powershell to obtain the public Ip for the server and send it to an email account. "
" "
" " 
"Obtaining the public IP: C:\discIP\temp.txt"
$client = new-object System.Net.WebClient
$client.DownloadFile("
 
$Content = [IO.File]::ReadAllText("C:\discIP\PublicIP.txt")
" "
"Public IP is: $Content"
" "
"Preparing the mail"
$From = "user mail"
$To = "user mail"
$Subject = “Public IP for your Router”
$Body = “The Public IP for your home´s router is: $Content”
$SMTPServer = "smtp.gmail.com"
$SMTPClient = New-Object Net.mail.SmtpClient($SMTPServer,587)
$SMTPClient.EnableSsl = $true
$SMTPUser = "usuario"
$SMTPPass = "password"
$SMTPClient.Credentials = New-Object System.Net.NetworkCredential("$SMTPUser",“$SMTPPass”)
" "
"Sending de Mail -- Please wait"
$SMTPClient.Send($From, $To, $Subject, $Body)
 
To write and execute this script you need PowerShell. Would be better if you have acces to PowerShell ISE, because it could correct posible mistakes during the typing process.
To execute scripts you need to grant access to script execution. To see if you OS is script execution permited type this directly to the PowerShell:
 
Get-ExecutionPolicy
 
Powershell will respond indicating if execution is restricted or not. In case it  is restricted we must tape:
 
Set-ExecutionPolicy Unrestricted
 
 
Basically the script goes to the web whatismyip wich has a service that provides your IP in a web page in plain text including only the value we need.
Using DownloadFile it download this page into a txt file called PublicIP.TXT.
 
The next step is to pass the entire file to a variable into our script. Don´t worry, the file only has your public IP, so using [IO.File]::ReadAllText we could have our public IP inside a variable to use into the script. In this case I used the variable $Content.
 
Now it´s time to prepare the mail with the "from", "to", "body" (of course our IP in $Content), and the rest of the data that SSMTPClient needs to send the mail.
There are a few of important points here. First the mail server, and the access to this mail server. its important to set the port to 587, the SSL access and to give both the user and the password. The server mail is of-course smtp.gmail.com
 
At this time I supose you must be very scared to put your mail account user and password  both together in the script code, there´s another way to do this without the need to put this password inside the script code, but this way uses a prompt to ask you for it, and when the program would run you wouldn´t be there to type the password, so we must do it in such this way, but we could use a secondary email account which passes this mails to our principal one, in this way we are not compromising our principal email account.
 
The last thing we must do is to set a Scheduled task in our Windows OS that launch the script once or twice a day. In future versions the script would sent the mail only if there was an IP Change avoiding unnecessary emails.

miércoles, 17 de octubre de 2012

Adding new roles to Windows 2008 R2 with powerShell

Actually you can visually add any role to your server with the Server Administrator. But now we have a new tool to work faster with our Windows 2008 Server.

This is the WIndows Powershell, which is Microsoft's task automation framework, consisting of a command-line shell and associatedscripting language built on top of, and integrated with the .NET Framework. PowerShell provides full access to COM andWMI, enabling administrators to perform administrative tasks on both local and remote Windows systems.

For example. We are going to add the .net role to our OS with the powershell, but first of all we need to know the name for the role, so we must type and enter:

get-WindowsFeature

This must show a list of all the features names an wich of them are installed. In our case we found that .net role is called NET-Framework.
So finally to install this rolle we must use the command Add-WindowsFeature in the following way:

Add-WindowsFeature NET-Framework -restart

The final command -restar, restart the server if it is required.


sábado, 6 de octubre de 2012

Cervelo P2 Manillar de carretera./ Road handlebar


Con el manillar aero. / With the aero handlebar.

Lo primero de todo es soltar los cuatro cables, dos de cambios y dos para frenos, tiramos hacia atrás, pero sin desmontar el cableado por dentro del manillar. La idea es dejar el manillar con todo el cableado para poder intercambiar ámbos manillar según se necesite uno u otro.
Una vez retirados los cables podemos soltar el manillar de la potencia, y poner en su lugar el nuevo.

First of all we need to release the gear and the break cables, but only until the handlebar. The idea is to  leave the cables at the handlebar and then you could switch the aerobar and the road bar on demand easily.
Once you have released the cables you could also take the aero handlebar out.


Cables Sueltos / Break and Gear Cables 


Sin el manillar. / Without the Handlebar.

Manillar de triatlón. / The aero bar.

Manillar de carretera puesto. / The road bar installed.


Instalando el freno trasero. / Installing the rear break.

Una vez tengamos el manillar con las manetas montados procedemos a colocar los cables de freno y de cambio en el orden deseado. Mediremos la cantidad de funda necesaria para los cuatro cables teniendo en cuenta que podamos mover bién el manillar de izquierda a derecha y sin que sobre mucho. Ántes de meter el cable por las fundas no olvidar los topes de fundas en ámbos extremos.  En la Cervelo P2 los cables de freno trasero y cambios van guiados por dentro del cuadro. El cable de freno trasero entra por el inicio del tubo horizontal y sale por esta abertura al final de dicho tubo. No hay problema para pasar el cable, ya al introducir el cable de freno lo deslizamos y terminará saliendo por esta abertura son problema alguno.

Once we have the road bar in his place, we can start to install the Outer cables. We need to cut those outer cables, measuring the right amount of it, allowing to move the handlebar without problems, and without having a lot of outer cable excess which could interface in our pedaling movements. Don't forget the plastic ferrules in the beginning and in the end of each outer cable.
In the Cervelo P2 the gear cables, and the rear brake cable goes through the frame. In the case of the rear brake cable, it entry by the beginning of the horizontal tube, and goes out at the end of this tube across a hole in the frame. There is no problem to pass the cable by this hole because is big enough to pass it by. 


Abertura de salida del cable de freno trasero.
Exit for the rear brake cable.

Una vez sacado el cable por el orificio ponemos la tapa del mismo y el trozo de funda de cable que lleva hasta el mismo freno. Lo pasamos por este y podemos apretarlo.

Once we have passed the cable by this exit hole, we must put the hole cover and the final outer cable until the brake caliper, and pass the inner cable by the calliper. 

Freno trasero instalado. / Rear brake installed.

El freno delantero es mas fácil, ya que va directo de la maneta a la pinza de freno. 

The front brake is more easy to install, because it goes directly to the brake caliper.


El siguiente paso sería instalar los cables de cambio, que al igual que los de freno van guiados por el interior del tubo diagonal. Uno a cada lado del tubo. El de cambio trasero por la derecha y el de cambio delantero por la izquierda. 
Aquí no se pueden meter los cables como hicimos con el freno trasero, ya que la abertura de salida es complicada de acceder. Para ello necesitamos dos guías. Una primera rígida de alambre que introduciremos por arriba ( el orificio es mas estrecho) y sacaremos por abajo.

The next step is to install the gear cables. It goes also by the inside of the frame, and by the diagonal tube. One for each side of this tube. The rear gear cable goes by the right, and the front gear by the left.
Here, the way to pass the cables through the tube is a little more difficult than the rear brake one. You will need two cable guides, one rigid one and another thinnest and flexible one. 
First we use the rigid one, introducing it by de upper orifice and extracting it by the lower orifice near the pedalier. 

La guia rígida dentro del cuadro. / Fixed cableguide made of wire

Después al extremo de esta guía rígida pegaremos una fina de cable con cinta aislante o algo parecido para tirar de la rígida metiendo el cable (rojo en la foto). Quedará entonces la guía roja y flexible dentro del cuadro. Por último repetimos la operación, pero ahora con la guía roja y el cable de cambio. De esa manera sacaremos el cable de cambio por la parte de abajo. Repetimos la operación con el otro cable. El porque de usar dos guías es porque la primera rígida es necesaria para poder acertar en el agujero de salida, y esta guía junto con el cable del cambio no caben por el orificio de entrada al cuadro. Necesitamos un hilo mas fino que nos permita tirar del cable de cambio, y para eso usamos la segunda guía roja.

Later we must use the rigid cable guide to introduce a thinest and flexible cable guide (red cable) into the diagonal tube. 
Finally we used this red cable guide to introduce the gear cable into the diagonal cable, an extract it by the lower hole near the pedalier.
You are forced to do this in this way because the upper orifice is so straight that both the rigid cable guide and the gear cable couldn´t pass toghether trough it.

Guia flexible. Flexible cableguide.

Cinta para proteger la entrada. / Use tape to protect the orifice

Los cables sacados con la guía.
Gear cables with the cableguide connected.


Cableado instalado. / All the cables installed.
Por último conectamos los cables a los cambios y procedemos a afinar ambos cambios. Una vez hecho esto cortamos el sobrante de cable y ponemos los terminales de cable para evitar que estos se deshilachen.

Finally we must connect the cables to the rear and front gears, and could start to tuning the gears to an appropriate function.


Afinando los cambios. / Tuning the gears.

Terminal de cable. / Cable end.

En este punto ya podemos instalar la cinta de manillar y las gomas de los escaladores, y ya tenemos la bicicleta lista con el manillar de carretera. En mi caso además añadí un manillar aero.

At this point we can put the tape to the bar, and this is it,.... in my case I added an aero bar.


Instalando la cinta de manillar. / Installing the tape bar.


El resultado final. / The final result.


viernes, 5 de octubre de 2012

Wellcome to Ljungbyhed !!

Place/Lugar: Ljungbyhed, Klippan, Skåne, Sweden / Suecia.
Bike/Bici: Orbea Onix


Beautiful place to go with your bike. Mostly flat, except  the Söderåsen National Park, wich is a more hilly terrain. Good roads, with good tarmac, very good cycle lanes and beautiful sights. Ljungbyhed is a small town in the Klippan´s community at the Skåne region in the south of Sweden known by his aerodrome and his aeronautic festival. So close to the sea and the town of Helsinborg at the Öresund straight.

Bonita zona para recorrer con la bici, eso si, casi todo plano, plano, salvo la zona del parque de Söderåsen que cuenta con algunas colinas. Buenas carreteras, con buenos carriles bici y con bonitos parajes. Ljungbyhed es un pequeño pueblo de la comunidad de Klippan en la provincia de Skåne en el sur de Suecia y muy conocida por su aeródromo y su festival aéreo. Cercana al mar y a la ciudad de Helsingborg en el estrecho del Öresund.